Introduction
I woke up with a realization that when I’ll be ready to learn CTF? — Not until I start once for sure.
As a complete newcomer, I joined HackTheBox’s CTF Try Out event for my first experience to play CTF. Honestly, I struggled solving these challenges because I have no experience in using tools. The thing I realized is that HTB wants you to never stop exploring and breaking things.
I wrote this full walk-through to help anyone who can’t find a clue, not to cheat, but to learn and enjoy the process!
NOTE
Since I’m just also a newcomer, please be aware that some writeup details might be missing or un-perfectly explained, but I gave my full efforts on this. Enjoy!
About Team
- Team Name: mɨnɨM1nn
- Motto: “Listen to the silence.”
- Members: mɨnɨMinn
Preparation
So, to know CTF standards for sure, HTB uses custom services on non-standard ports.
- If the port number is
22, it’s likely SSH:
# Example
ssh 126.211.34.10 -p 22- Any other port (e.g.,
3000,9000,3657) - it likely a website or a raw TCP service meant fornetcat:
# Example
nc 20.382.480.21 3000
Hardware Challenges
It’s Oops PM
Difficulty: Very easy
Points: 875
Objective: Trigger a backdoor in a TPM crypto-processor by providing a specific 16-bit input.
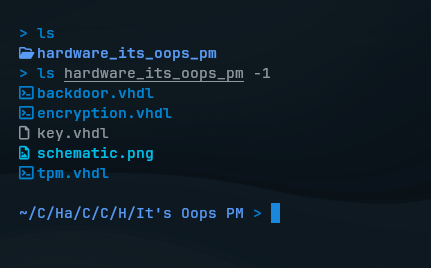
First, we should download the challenge files. These are VHDL (VHSIC Hardware Description Language) designed for a cryptographic processor used in environmental sensors communicating with a satellite.
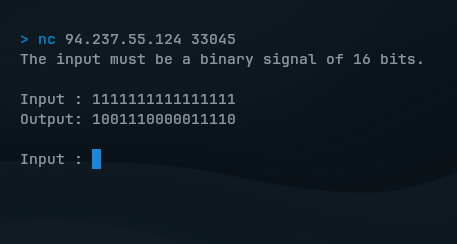
First connect to the challenge and let’s test it out how it encrypts my input binary data of length 16 bits:
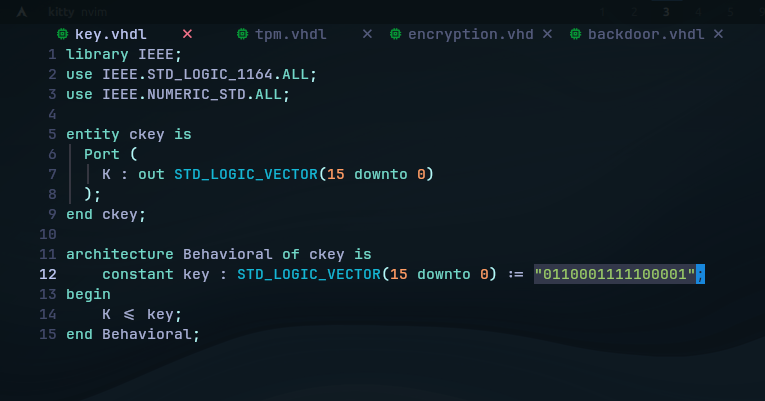
If you look at the scenario file key.vhdl, it encrypts using XOR logic by the hardcoded key in 0110001111100001:
But, only the specific 16-bit binary input bypasses the encryption and will trigger the hidden backdoor.
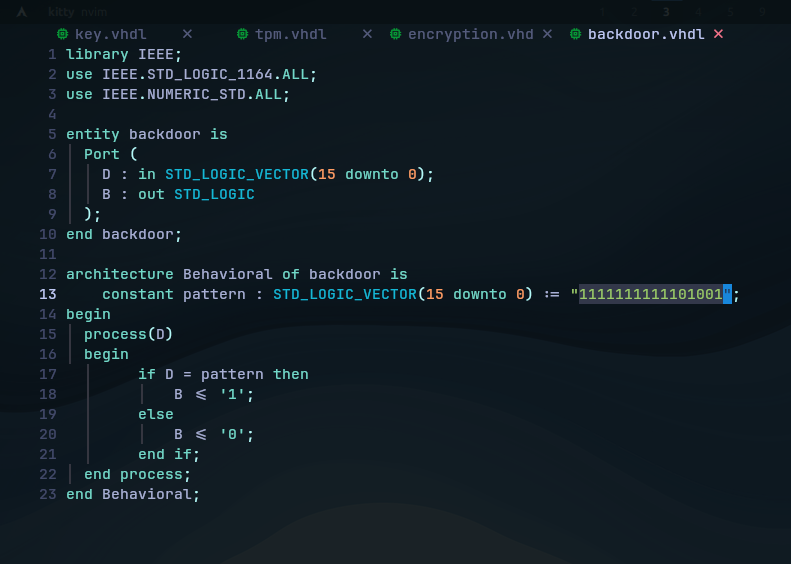
The hardcoded backdoor pattern is simply found in backdoor.vhdl, which means If B = '1', the output becomes the Key instead of the encrypted data:
In the service, enter the pattern we found to see if it triggers the backdoor:

(SPOILER) Click to see the flag
The Flag:
HTB{4_7yp1c41_53cu23_TPM_ch1p}
Critical Flight
Difficulty: Very easy
Points: 900
Objective: Analyze a compromised PCB design to uncover a hidden flag.
We got a ZIP file containing Gerber (GBR) files, which are used to describe the physical layers of a Printed Circuit Board (PCB) used in drones flight.
 In summary, these include:
- Copper: Conductive traces connecting components.
- Soldermask: Protective layer (typically green) preventing shorts.
- Silkscreen: Text printed on the board.
- Solderpaste: Facilitates electrical connections.
- Drill & Outline: Define holes and board shape.
Since someone has sabotaged the design to make drones fail from flying, let’s analyze those flight controller files with a Gerber File Viewer software:
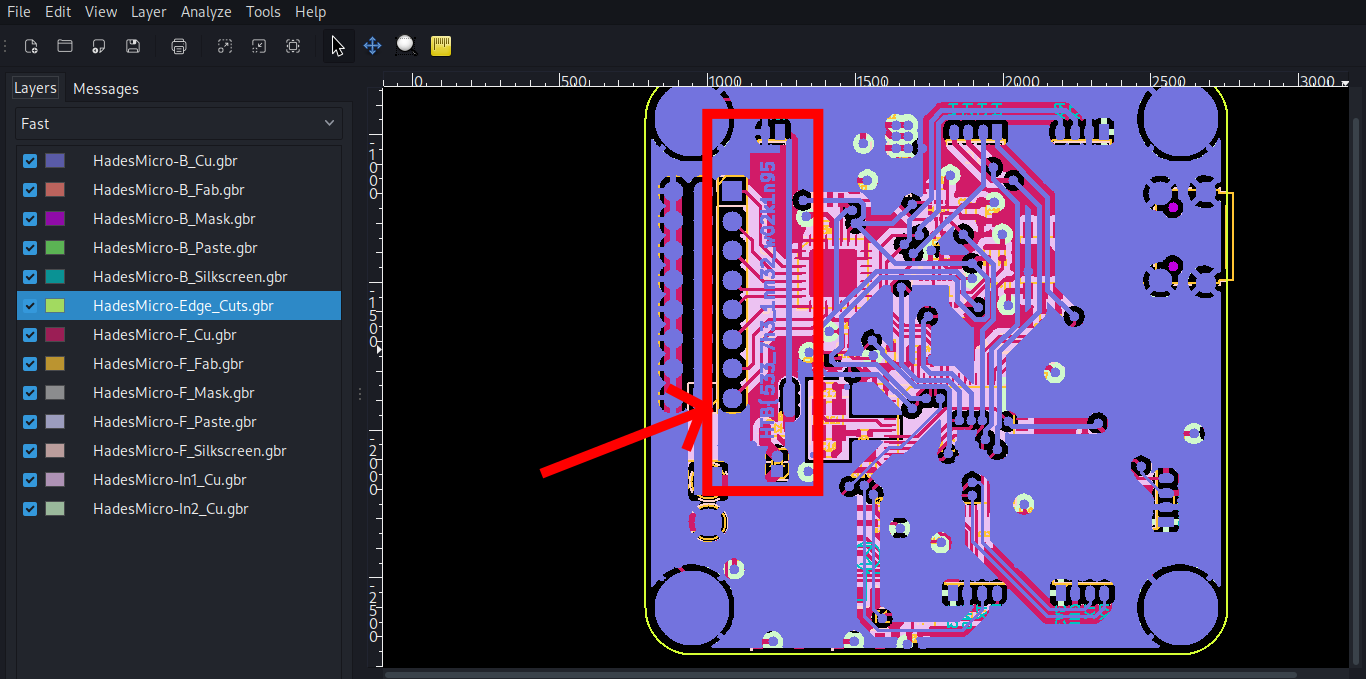 Just on the first layer called mechanical layer, the first half of the flag is found:
 HTB{533_7h3_1nn32_w02k1n95
 Meaning
 See the inner working, so we should keep analyzing the inner layers beneath it. In the left sidebar, I disabled layers by layers until I see the trace:
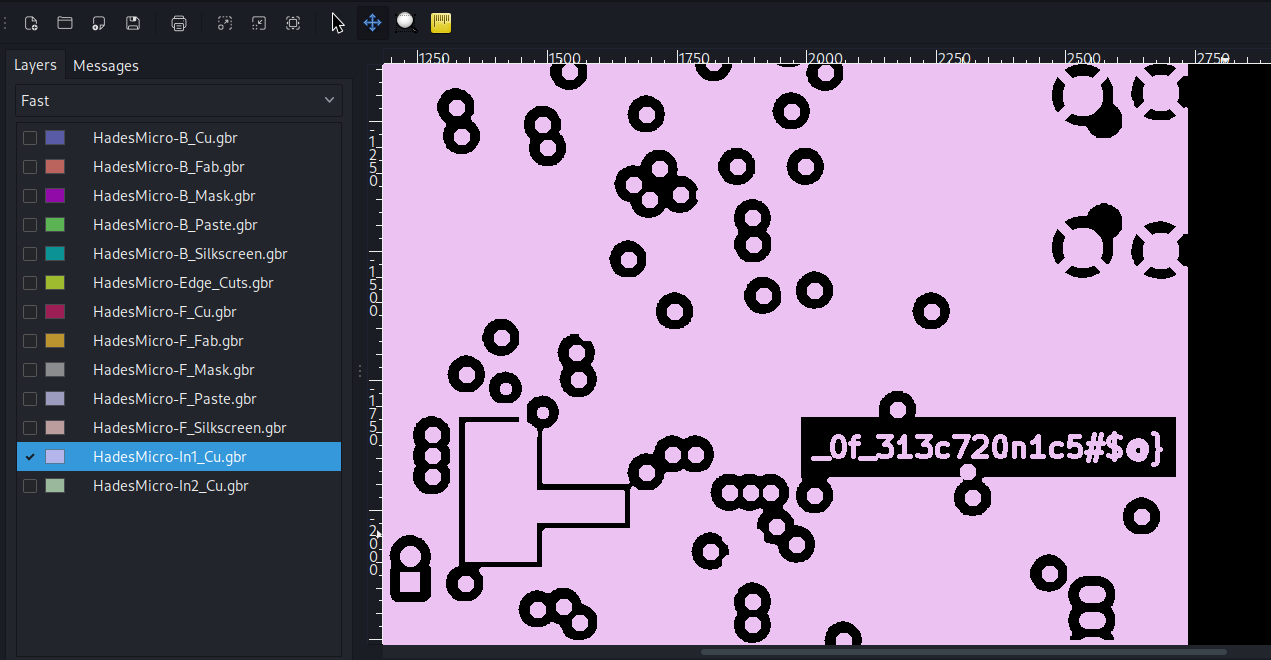 There we go, we see the second half of the flag.
(SPOILER) Click to see the flag
The Flag:
HTB{533_7h3_1nn32_w02k1n95_0f_313c720n1c5#$@}
Debug
Difficulty: Easy
Points: 950
Objective: Trigger a backdoor in a TPM crypto-processor by providing a specific 16-bit input.
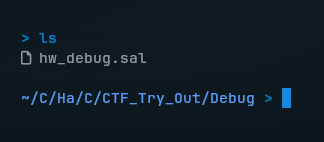
For this challenge, we’ll be doing serial signal analysis on SALEAE (.sal) file that contains recorded digital signals from a satellite dish’s debugging interface:
To open those recorded signals, I’ll be using Saleae Logic 2 software, and view them in a single channel:

“Can you help to decode the signal and find the source of the interference?”
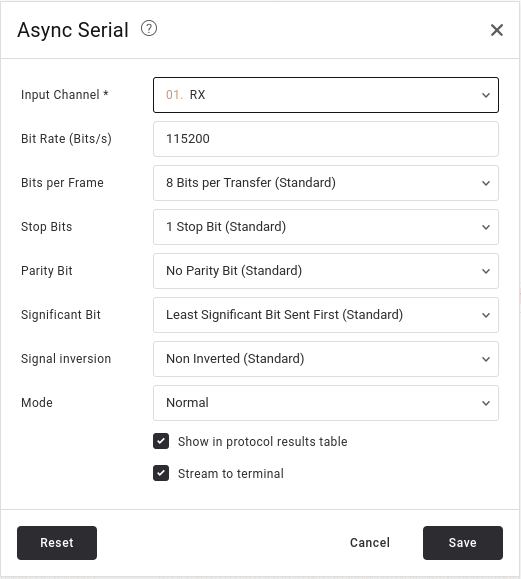
As the challenge asked, we will need to decode this serial communication data with an Async Serial analyzer. I set the common settings as follow:
- Baud rate: 115200 (a common rate for satellite and embedded devices).
- Leave the rest as default: 8 data bits, 1 stop bit, no parity.
After applying analyzer, the output will reveal a boot log sequence. In the terminal output, scroll through and follow the traces:
 |  |
|---|
I copied all the terminal output and pasted in a text editor. Then, we see the flag.
(SPOILER) Click to see the flag
The Flag:
HTB{547311173_n37w02k_c0mp20m153d}
ICS (Industrial Control System) Challenges
Shush Protocol
Difficulty: Very easy
Points: 900
Objective: Locate the packet that contains the secret information.
According to the challenge:
Scenario
Having captured the traffic from that connection the only thing that remains is to locate the packet that contains the secret information.
We are provided with a network traffic captured file:

.pcapng or (PCAP Next Generation) is a network traffic data containing raw network packets, usually headers and payloads, captured from a live network or simulated environment.
So, we shall happily use Wireshark software to open these files:
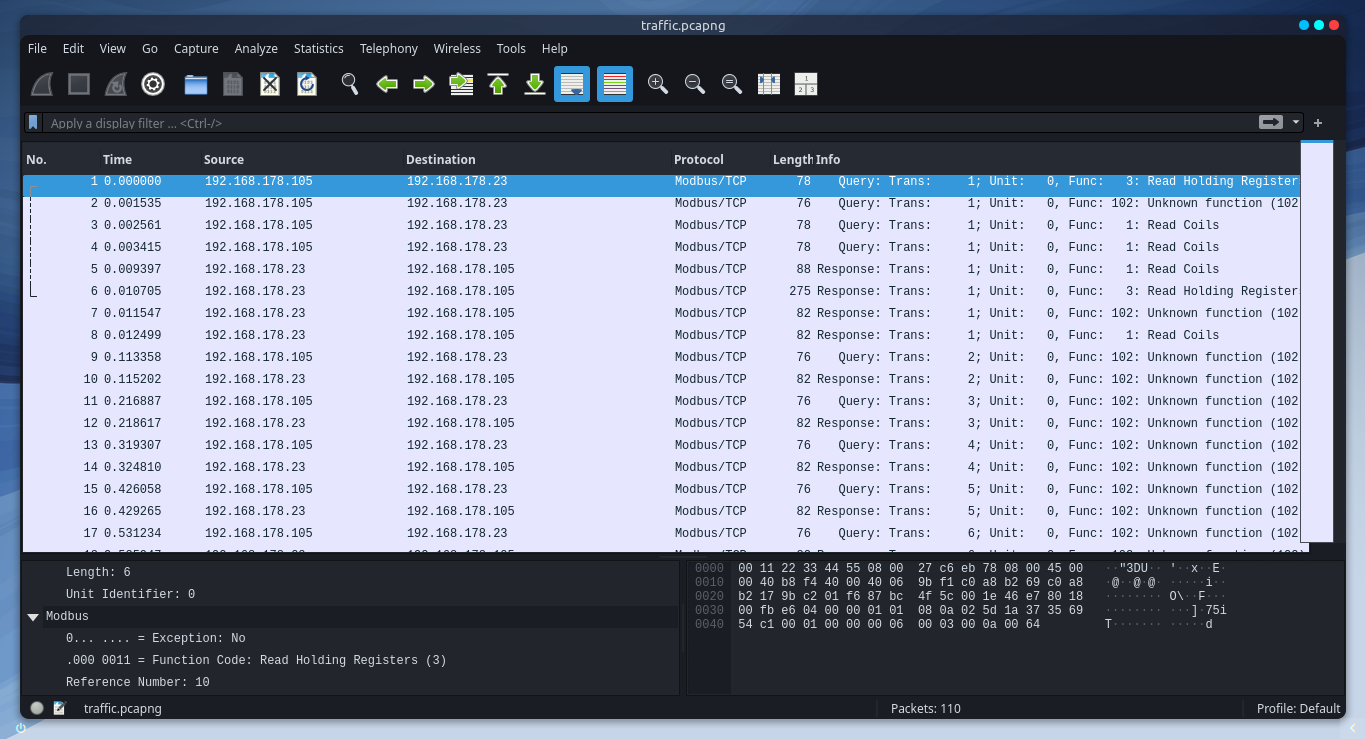
Since the specific secret information is could be in one of these frames, let’s first quickly filter a pattern by “frame contains HTB{”:
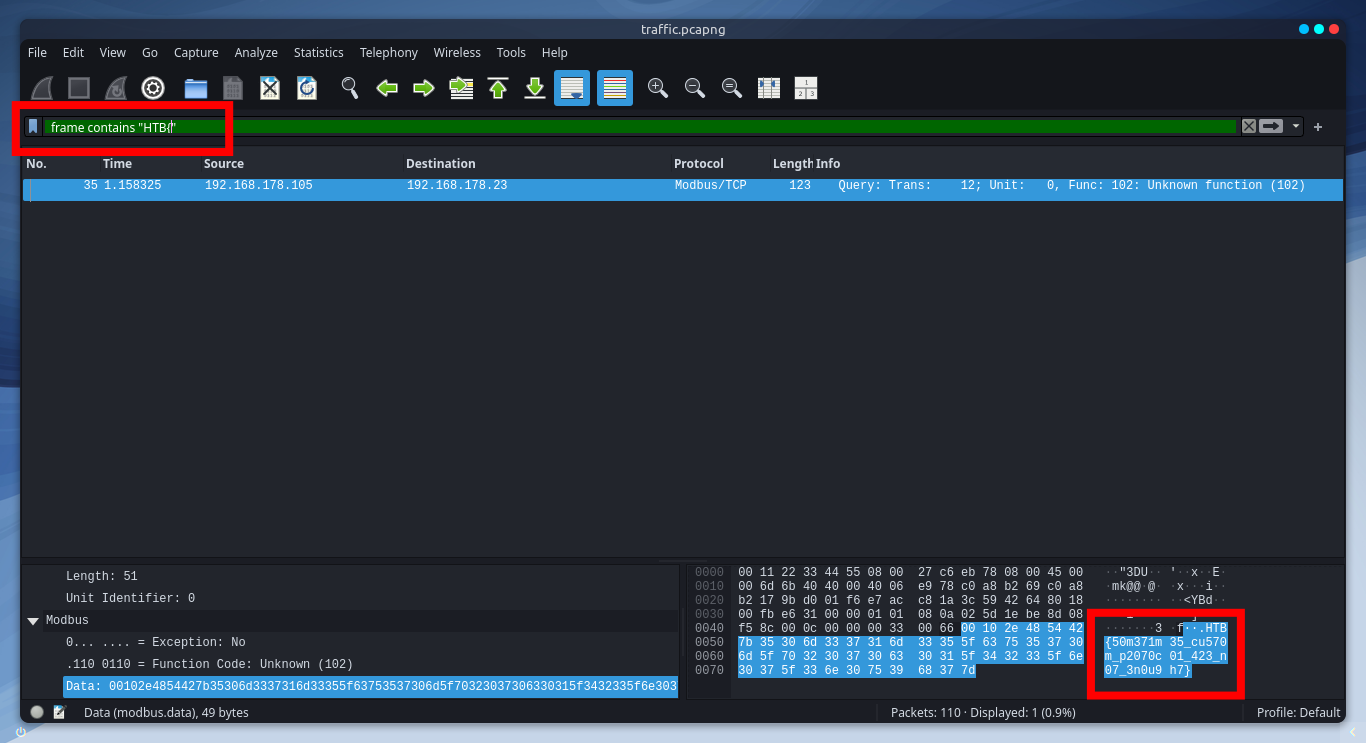
There it is! We found the flag in that specific frame.
(SPOILER) Click to see the flag
The Flag:
HTB{50m371m35_cu570m_p2070c01_423_n07_3n0u9h7}
Reversing Challenges
FlagCasino
Difficulty: Very easy
Points: 925
Objective: Understand the logic of seeded random number generation.
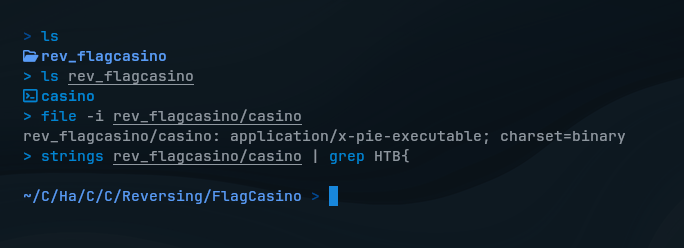
We download the challenge files first, and got a pre-complied file that is executable on x86-64 Linux systems. Before deep dive into reversing, as I heard of, we should always try basic reconnaissance on the file.
So, I tried if there’re anything useful info to see with strings and file commands, but nothing showed up.
Let’s see the decompiled code of casino in Ghidra to see how it really works:
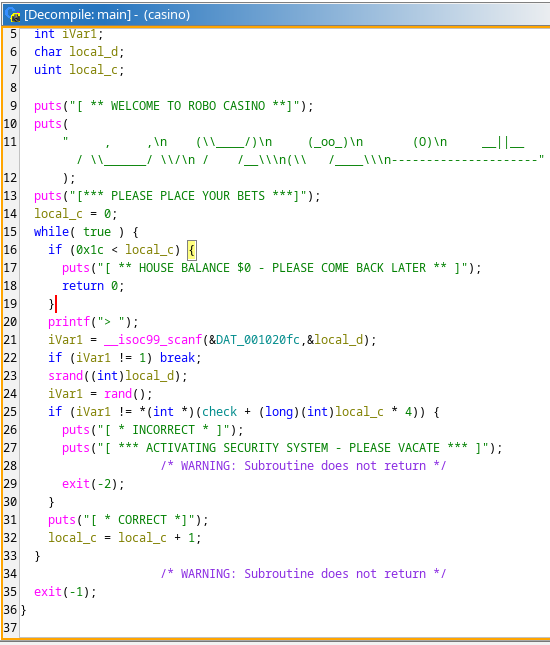
There’re lots of codes to see, but let’s break it down in summary.
So, this line reads a Char (our input) and stores in local_d:
iVar1 = __isoc99_scanf(&DAT_001020fc,&local_d);Which then, it seeds the random number generator using our input and generates a random number:
srand((int)local_d);
iVar1 = rand();
What I mean by that is if you give the same seed to srand(), rand() will always generate the same number.
srand(seed)seeds the starting point for randomness.rand()by starting point, it gives us a number. (same seed = same random number)
Now, we know it uses a kind of vulnerable random number generator which uses our input as a seed, so that we can actually predict what the random number would be.
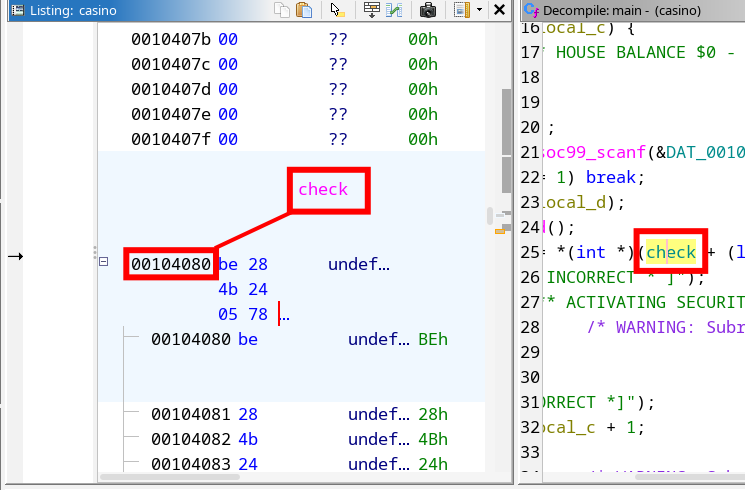
After analyzing more to understand what the program wants us to enter, this code says something:
if (iVar1 != *(int *)(check + (long)(int)local_c * 4)) {
    puts("[ * INCORRECT * ]");
    puts("[ *** ACTIVATING SECURITY SYSTEM - PLEASE VACATE *** ]");
    exit(-2);
}
puts("[ * CORRECT *]");
local_c = local_c + 1;
The program expects random numbers contained in that check array. It bases on the our input used as a seed to srand() for rand(), it generates a number, which then compared with check array expecting to be equal.
What we can do now is we can find where random numbers are located in the check array. For each located random numbers, we will determine which input character → used as seed → then produces that random number value (which the program expects) by rand().
In Ghidra > Decompile window, I double-clicked on check function to see its array address:
So, I opened ./casino the binary file with GDB tool and looked up the address where the check array is located. Starting from the memory address 0x4080, I viewed 30 memory units to see if these random values relevant to check:
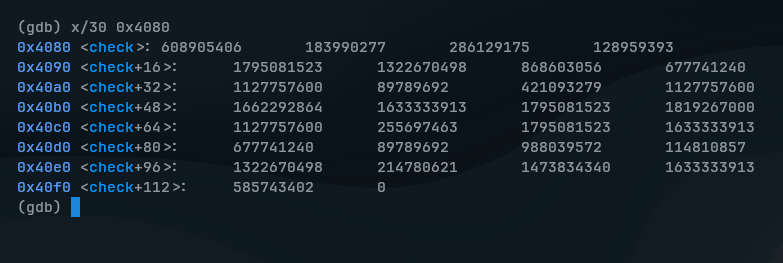
In total, 29 integers were only confirmed to be relevant, the last 0 wasn’t a part of it.
Because of this code, which only loops from local_c = 0 to hex: 0x1c (decimal: 28) times, there’re 29 integers in total:
while( true ) {
  if (0x1c < local_c) {
    puts("[ ** HOUSE BALANCE $0 - PLEASE COME BACK LATER ** ]");
    return 0;
  }
...
Now, 29 integers are surely remain to figure out which ASCII character (0-255) is used as seed to srand(). If the seed is correct, rand() will generate same value as one of those 29 integers.
To do so, I used a help of Python script to automate this process:
import ctypes

libc = ctypes.CDLL("libc.so.6")

check = [608905406,183990277,286129175, ...]
correct_inputs = "" # what ASCII inputs make correct Seeds
correct_seeds = "" # what correct Seeds generate same value as array

for target in check:
    for seed in range(256):
        libc.srand(seed)
        if libc.rand() == target:
            correct_inputs += chr(seed)
            correct_seeds += str(seed) + ","
            break

print("Inputs: ", correct_inputs)
print("Seeds: ", correct_seeds)
This script basically brute-forces every possible ASCII characters to see which seed gives the correct result. When a match is found in each loop, correct inputs are stored and also correct seeds.
(SPOILER) Click to see the flag
The Flag:
HTB{r4nd_1s_v3ry_pr3d1ct4bl3}
LootStash
Difficulty: Very easy
Points: 925
Objective: Find the flag through the stack of items.
Scenario
Can you filter through the stack to get to the one thing you really need?
We download the challenge files first, and as we should always do, we try basic reconnaissance on the target file:
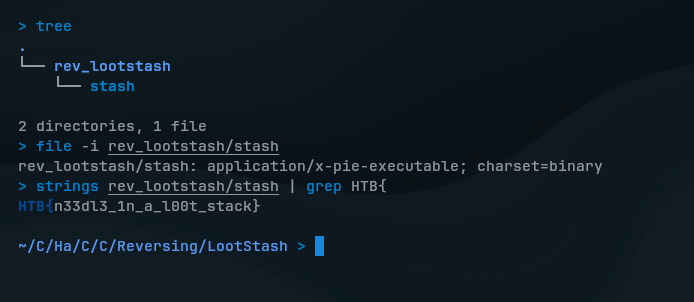
What a coincidence, I didn’t expect that the flag would be clearly visible. So before testing the program, I extracted that binary file to see if there’re some human-readable strings using with strings command, which then the flag was actually found in the stack of items.
If you’re on Windows, this should work the same as well:
# Available in sysinternals
strings.exe rev_lootstash/stash | Select-String "HTB{"
(SPOILER) Click to see the flag
The Flag:
HTB{n33dl3_1n_a_l00t_stack}
Don’t Panic!
Difficulty: Easy
Points: 975
Objective: Extract the flag by analyzing a series of a specific function calls.
Scenario
Now, you must find a way past the highly sensitive heat-signature detection robot. Can you disable the security robot without setting off the alarm?
We download the challenge files and try basic reconnaissance as should we should always do:
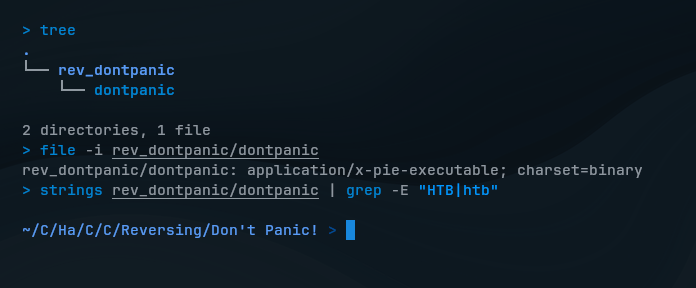
We see nothing useful there. So, I explored the code with Ghidra and found a interesting function src::check_flag, seems it validates our input to the program using a loop to check characters one by one:
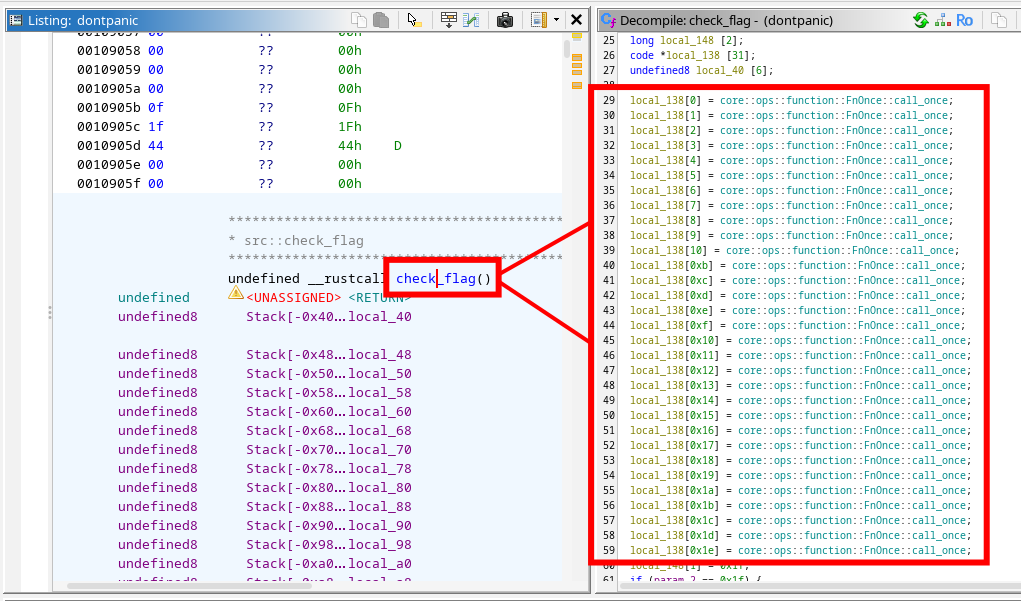
This looks interesting that we see the function is called 31 times, from 0 to 1e (30 in decimal) and this could be the characters (the flag) we’re looking for. As far I have researched, these functions are handled by Rust’s FnOnce::call_once mechanism to check characters and to ensure they’re called only once in a loop.
So, I clicked on the first FnOnce::call_once to check what it really does:
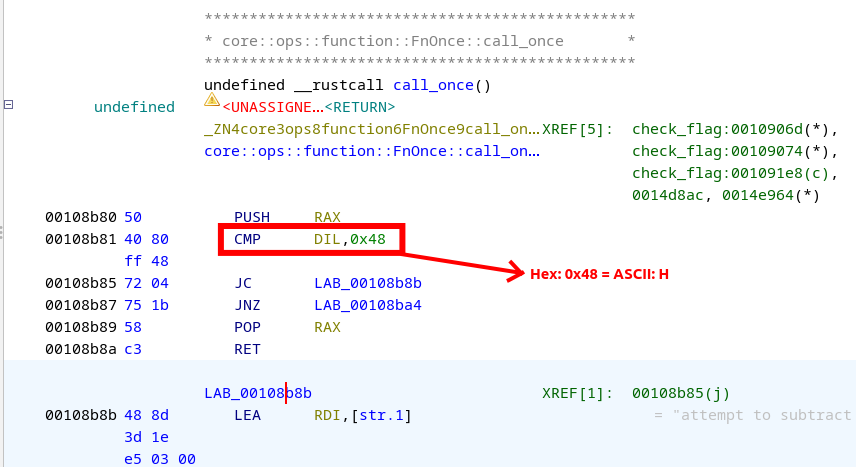
In the first call function, we see that it performs cmp (compare) instruction to compare the expected value with the corresponding character (in this case: 0x48 or “H” in ASCII) in the user input.
Now, an idea came up to my mind is to check all of these 31 FnOnce::call_once one by one and collect each hex values, convert them altogether into ASCII and see if I can get the flag.
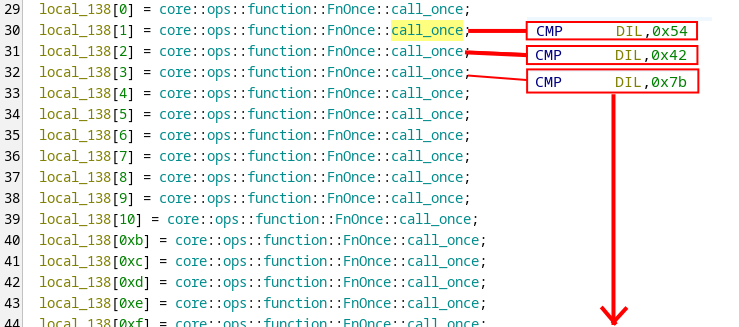
So, moving on the next functions, we will find another hex values that represent ASCII characters:
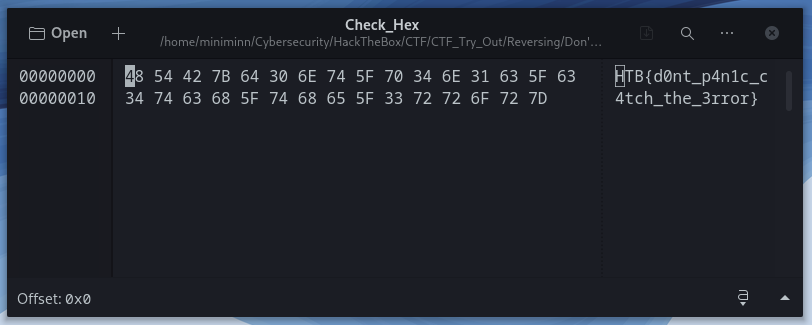
After collecting all of these hex values with Ghex, we finally get the flag.
While this method can be simple but manual, other players just create their own Python script to automate the process with Radare2 and GDB, but that would requires you to have essential knowledge of these tools.
(SPOILER) Click to see the flag
The Flag:
HTB{d0nt_p4n1c_c4tch_the_3rror}
Web Challenges
Jailbreak
Difficulty: Very easy
Points: 875
Objective: Construct a response message by XML payload.
I opened the given IP address on a browser:
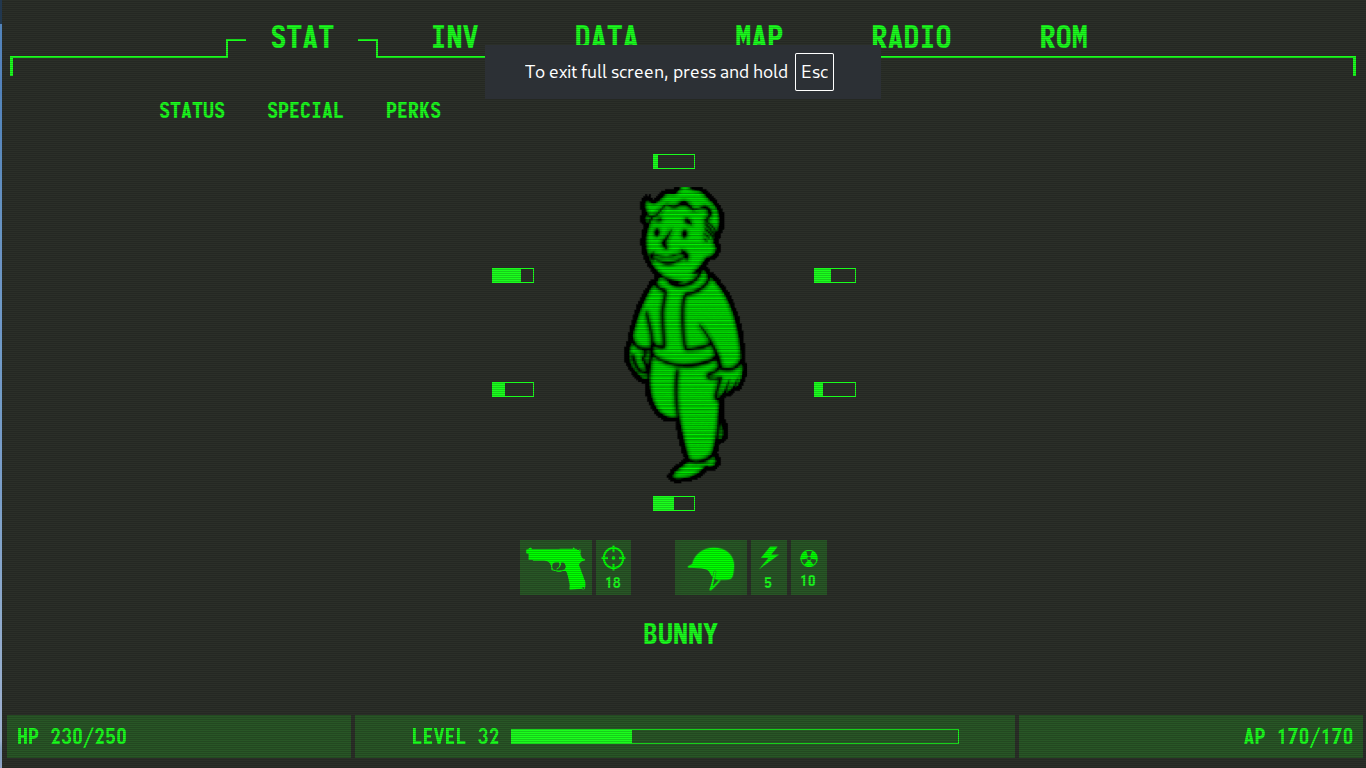
I explored around the web and went through all options: STAT, INV, DATA, MAP, RADIO. At ROM, I found an XML document.
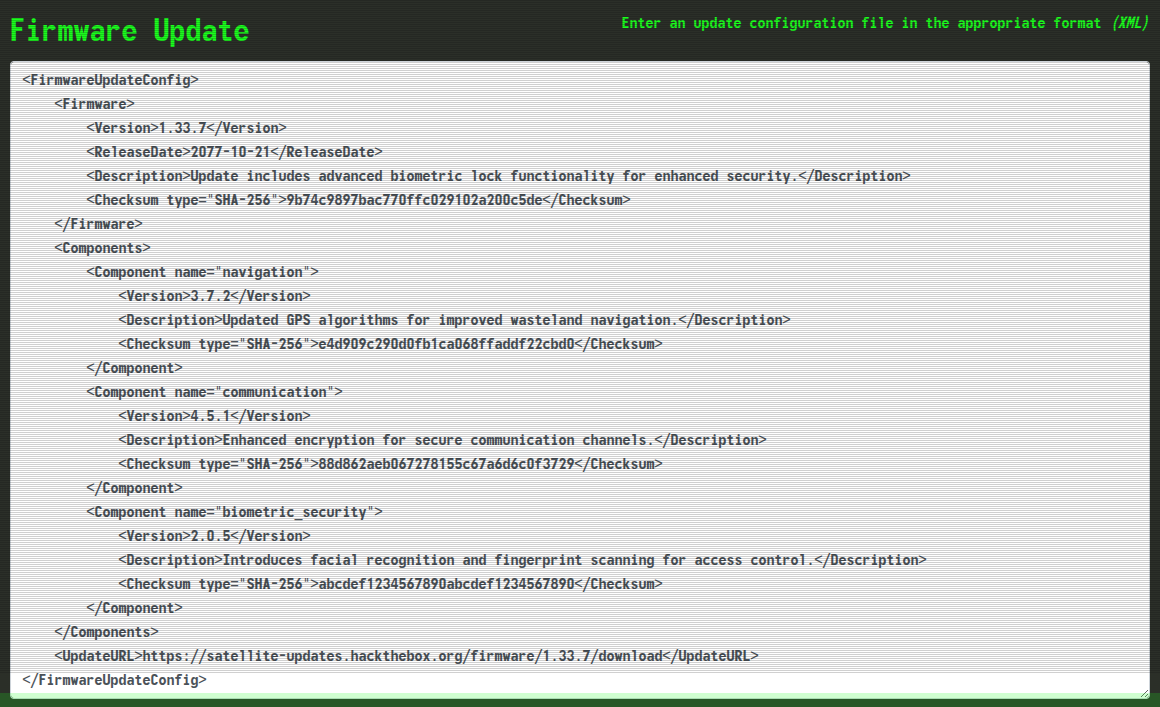
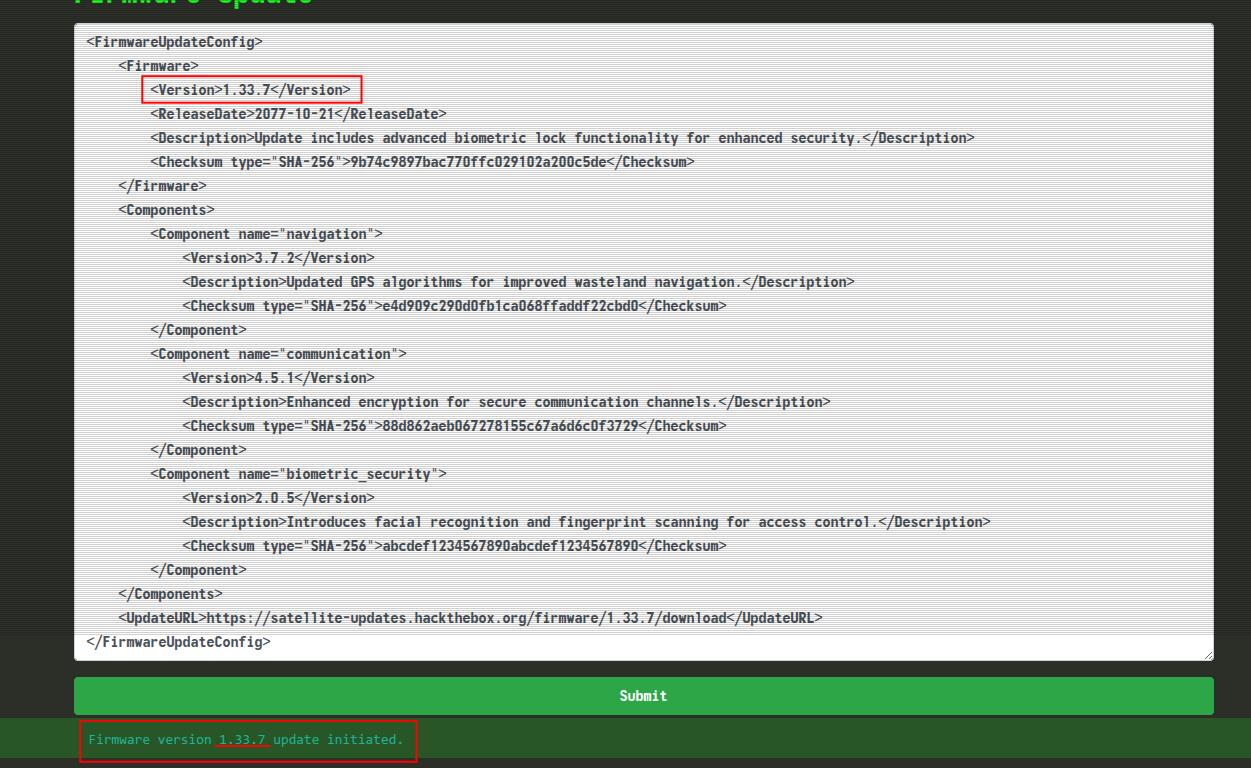
I tried submitting that update configuration to see what it does. When we look at the bottom, we can see that the app construct a response message by extracting a specific value <Version> from the XML input:
With this chance, I wrote a XML payload to read the flag and present it in <Version> tag:
<?xml version="1.0"?>
<!DOCTYPE xxe [
    <!ENTITY xxe SYSTEM "file:///flag.txt">
]>

<FirmwareUpdateConfig>
    <Firmware>
        <Version>&xxe;</Version>
    </Firmware>
</FirmwareUpdateConfig>
(SPOILER) Click to see the flag
The Flag:
HTB{b1om3tric_l0cks_4nd_fl1cker1ng_l1ghts_4ce0bd896b24bba122362528a2647a57}