
Turning an Old Router into an Access Point: Extending My Home Wi-Fi
Don’t throw your Old Router away just yet, if you have one!
We can turn it into an Access Point (AP) and boost Wi-Fi signal coverage in homes with multiple floors or thick walls—where a single home router often leaves weak signals in some areas. You’ve probably been there like huddling near the router and waiting for a large file download to finish without stalling or timing out.
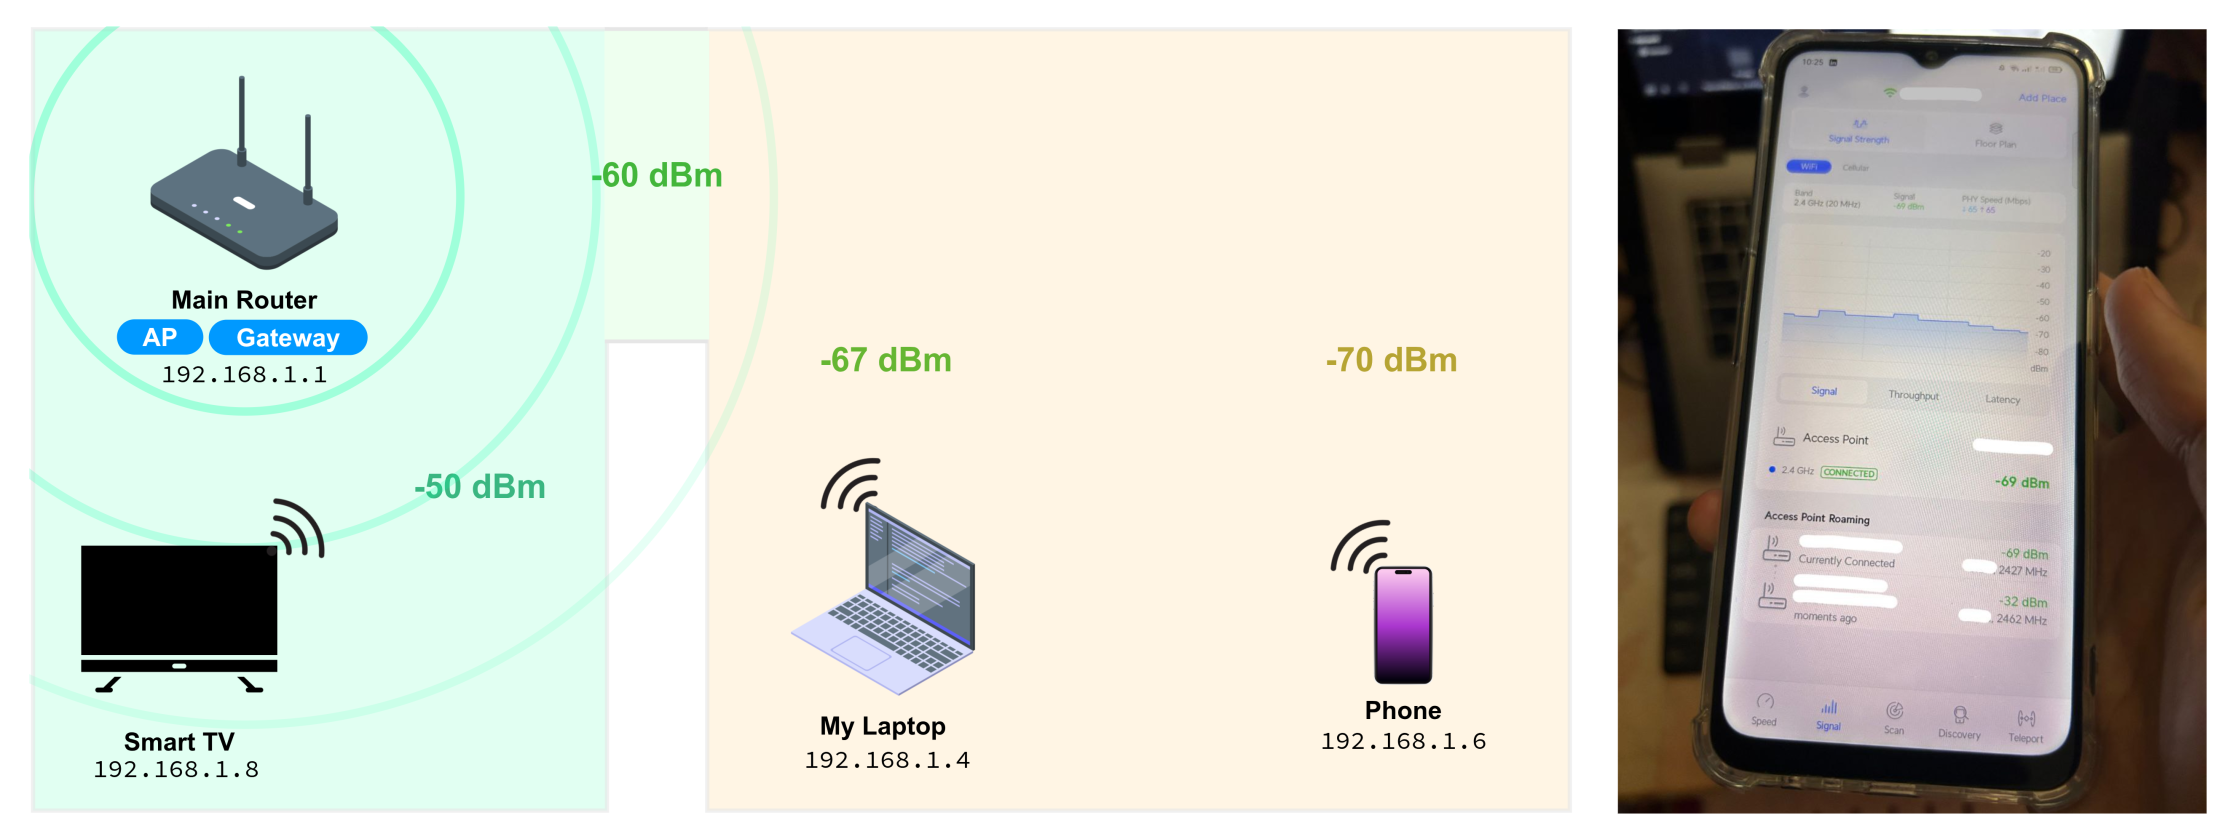
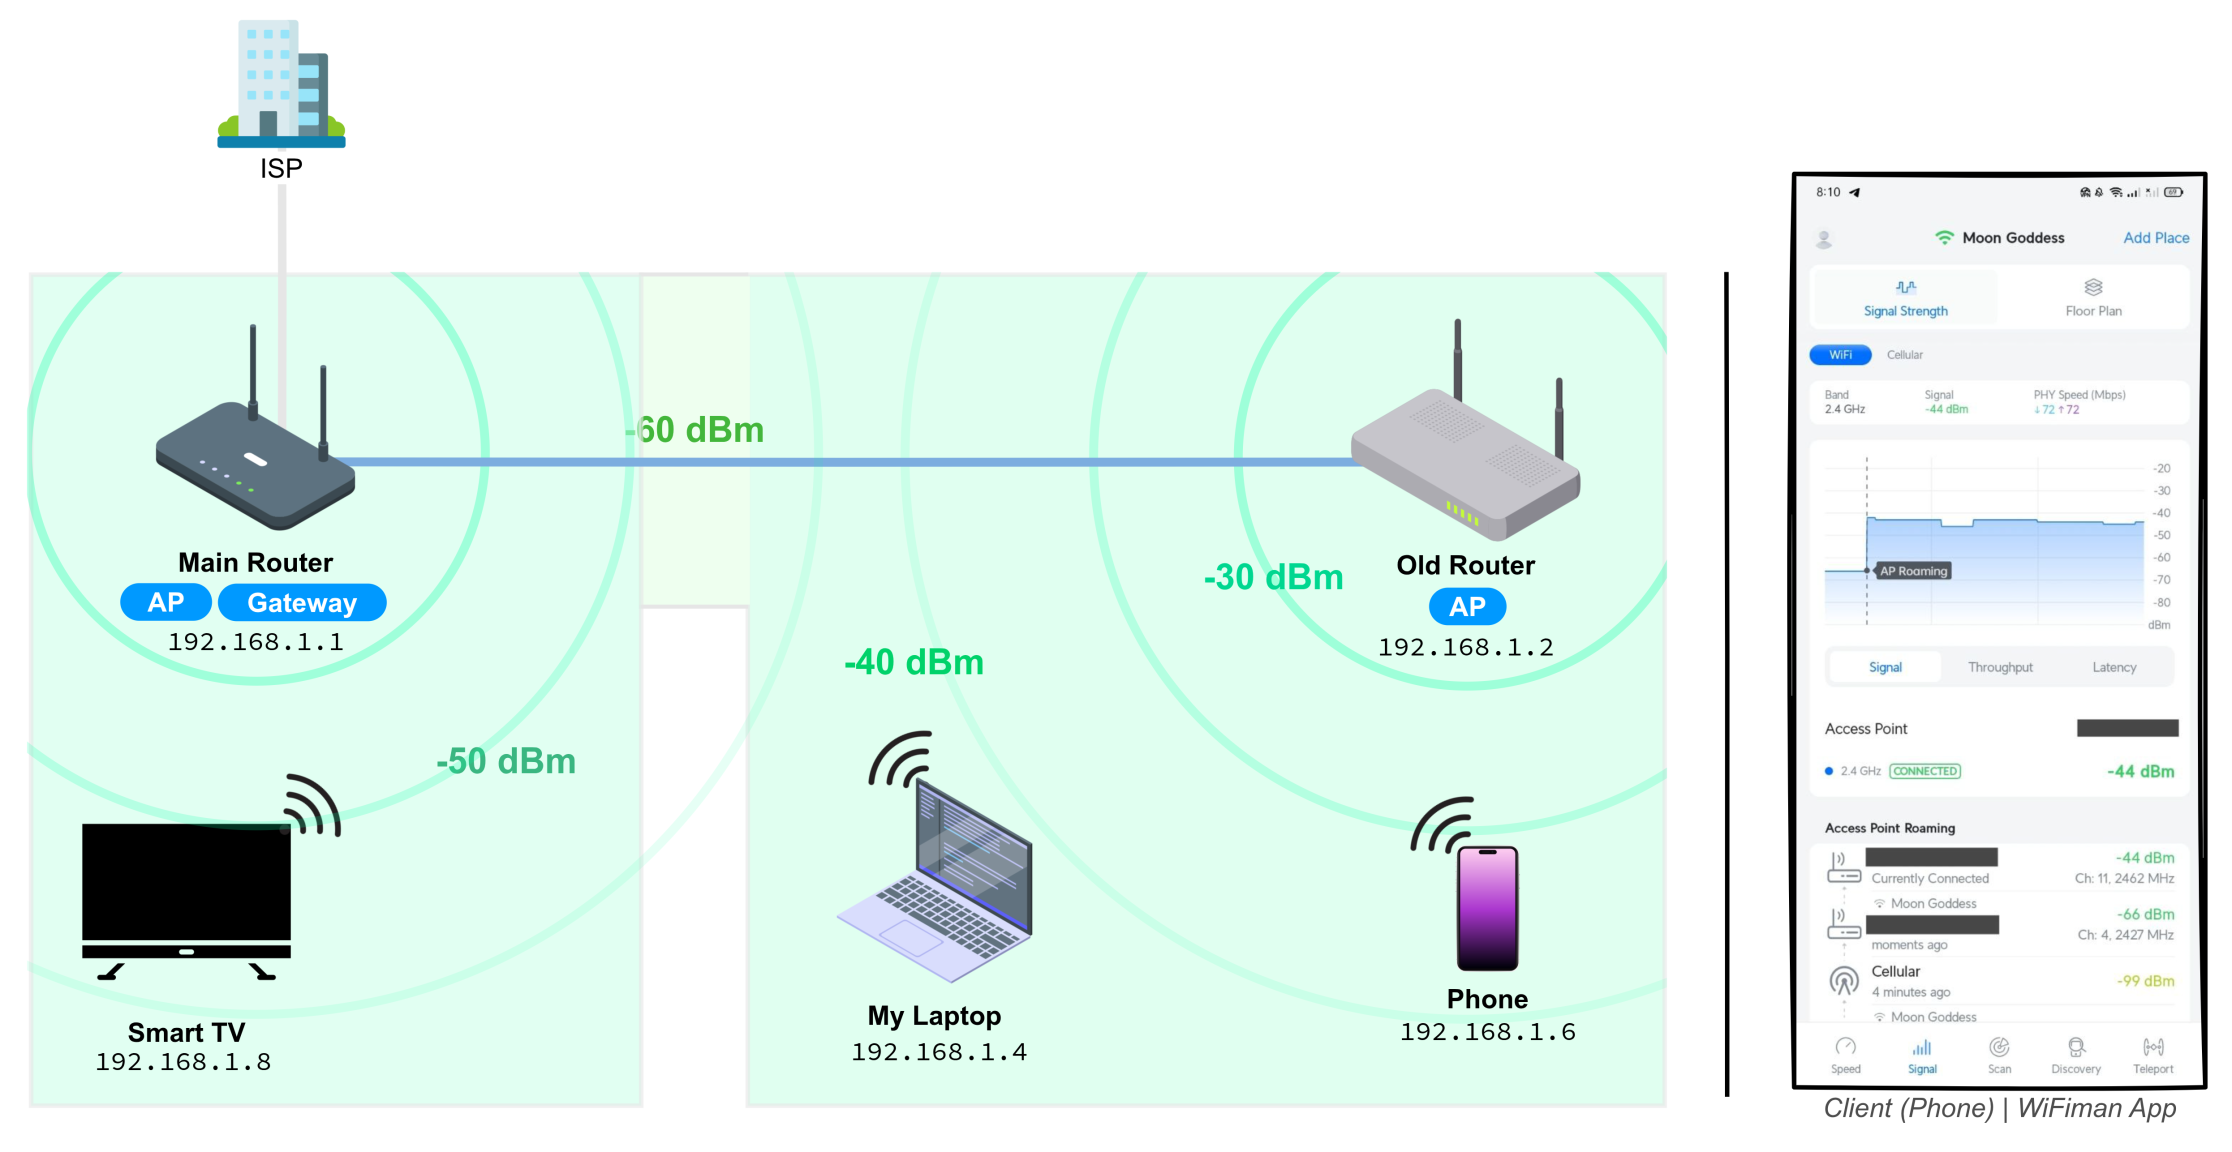
I measured the signal strength in different parts of my home using the WiFiman app. My family members were frustrated with spotty Wi-Fi as shown in the map, where the signal dropped from around -50 dBm in strong areas to -70 dBm in weaker rooms.
What about relocating the main router? it wasn’t actually an option since it’s connected via PON fiber, which fixes its placement to the ISP’s termination point. Even if I could move it, the original area would likely suffer weaker coverage.
The solution that worked best for me was re-purposing my old router into an AP and placing it in the middle of the weak-signal areas. This small setup can extend the coverage to the rest of the house by using an old router and an Ethernet cable.
How does an AP work in a home network?
So, an Access Point’s (AP) main job is to extend Wi-Fi coverage by connecting to the main router through an Ethernet cable, and then re-broadcasting the same wireless signal to client devices.

- The connection between the Main Router and the Old Router (used as an AP) is typically established via an Ethernet cable through their LAN ports.
- To make the setup work properly, the Old Router has its DHCP server disabled, because only the Main Router should be handling IP address assignments in a single network. NAT is also disabled to avoid confusions in port forwarding.
- Finally, the Old Router is assigned a static IP address within the same subnet as the home network but outside its DHCP range. This makes to be a part of the Main Router’s LAN infrastructure, rather than acting as just another client device.
Walk-through: Setting Up
Alright, you got the basic idea of how an Access Point works—but it’s worth mentioning that there are other ways to extend a Wi-Fi network, such as using Wireless Bridge or a Repeater mode. However, in my case, I focused on AP mode with a wired connection between routers to let it deliver full bandwidth, reliable Wi-Fi rebroadcasting, wired Ethernet access, and low latency.
1. Preparing a Compatible Old Router
Be cautious with outdated old router models, especially those limited to the 802.11b/g Wi-Fi standards. These can just bottleneck your connection.
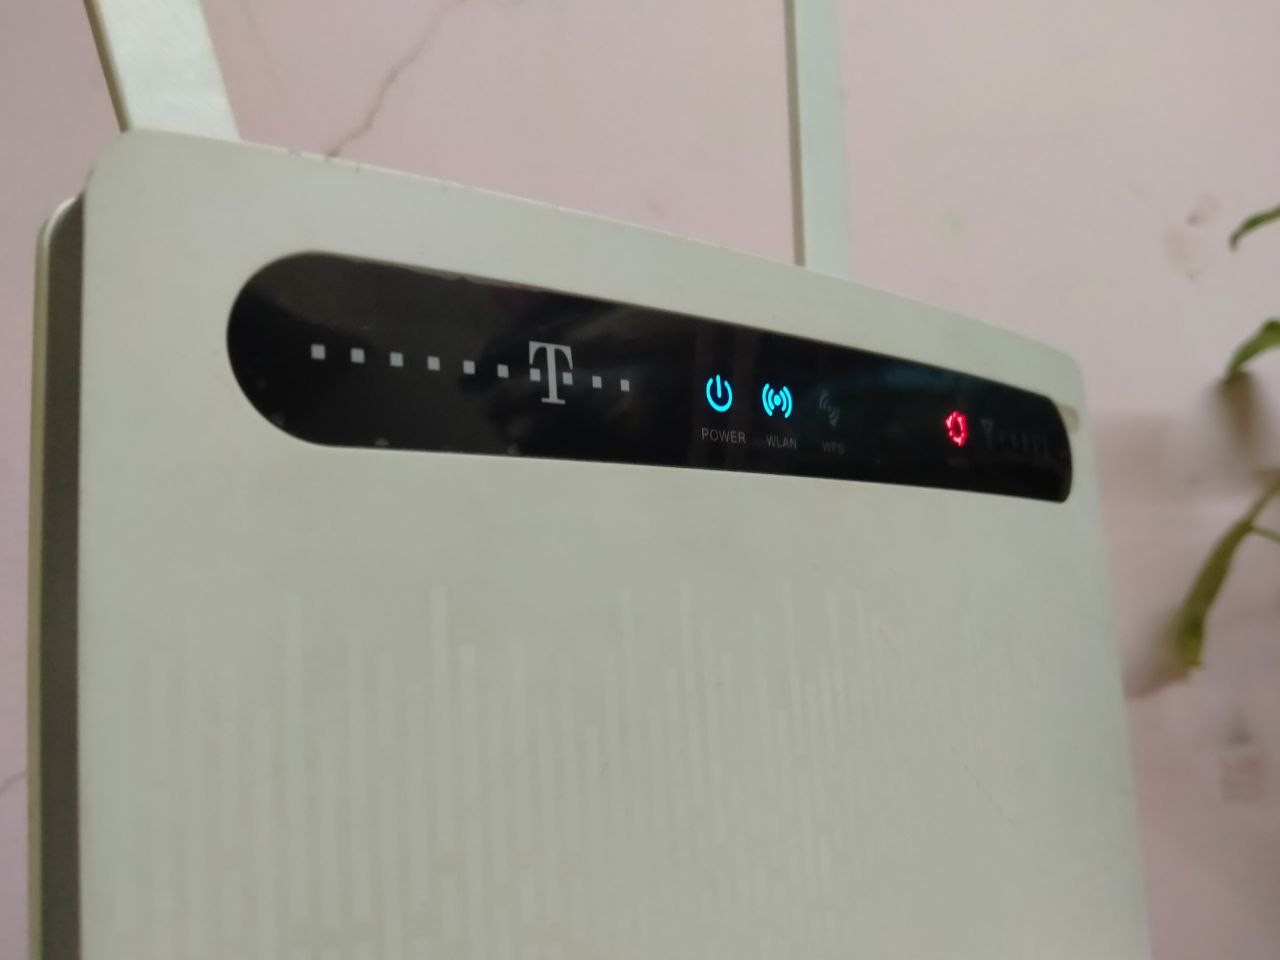
- I have an old router Huawei B593 4G LTE that supports up to 270 Mbps, while my current ISP’s Main Router only provides around 130 Mbps. Since my old router’s capacity is higher than my Main Router’s connection speed, I can confidently say that it is more than suitable to be reused as an secondary AP of the home network.
2. Factory Reset and Admin Credentials
If your Old Router was previously used for internet service, it’s best to perform a factory reset to clear out any leftover settings that might cause conflicts. After the reset, the router will return to its default state, including its original SSID and password. code
- Once the router has reset and rebooted, you can access it directly via an Ethernet cable. This method is more convenient than Wi-Fi at this stage since it bypasses the need to enter a password.
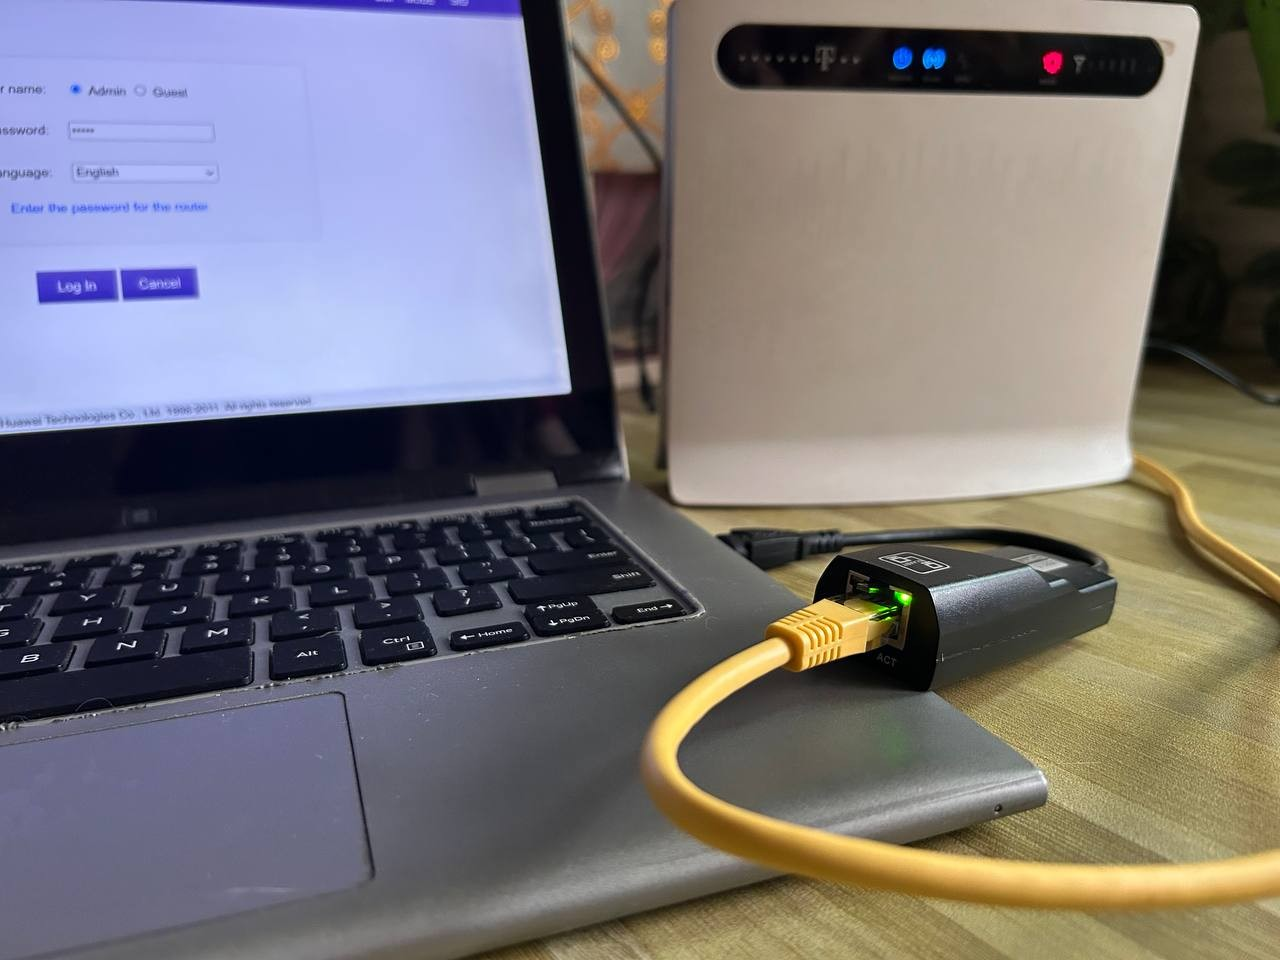
- Next, open a web browser and enter the Old Router’s default IP address—commonly 192.168.1.1 (or 192.168.1.0). This will take you to the admin login interface. Use the default login credentials, which are often “admin/admin”, or check the label on the back of the router.
If you don’t know the default credentials and the label is missing or unclear, you can look them up online by searching for the exact router brand and model along with the phrase “default admin credentials”- router passwords.

3. Configure the Settings
This is where the real configuration begins and became my family’s official Home Network Engineer.
First, navigate to the DHCP settings in your Old Router. Depending on the model, this may appear under Network Settings, LAN Setup, or DHCP Server. Once there, assign a static IP address:
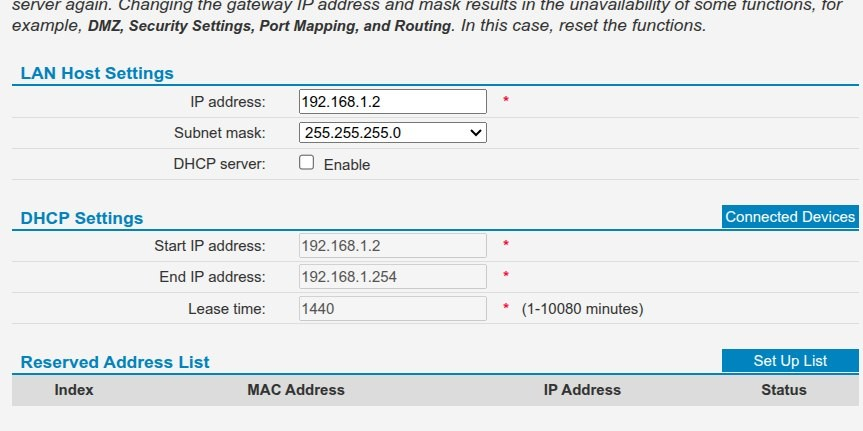
- In my setup, the Main Router uses the subnet 192.168.1.1 to 192.168.1.254, with its DHCP server handing out addresses between 192.168.1.100 and 192.168.1.200. To avoid overlap, I assigned my Old Router the static IP 192.168.1.2 to make it recognized as part of the main router’s LAN infrastructure, not a client device.
- Next, disable the DHCP server on the Old Router. Since it will act as an AP, the main router should handle all IP assignments. If both devices try to run DHCP, it can cause IP conflicts and DNS confusion, often resulting in lost internet access.
Once that’s done, configure the WLAN settings on the Old Router. You have two options: Use the same SSID and password as your Main Router for seamless roaming (devices automatically switch to the stronger signal without interruption), or, use a different SSID if you prefer to manually select which AP to connect to.
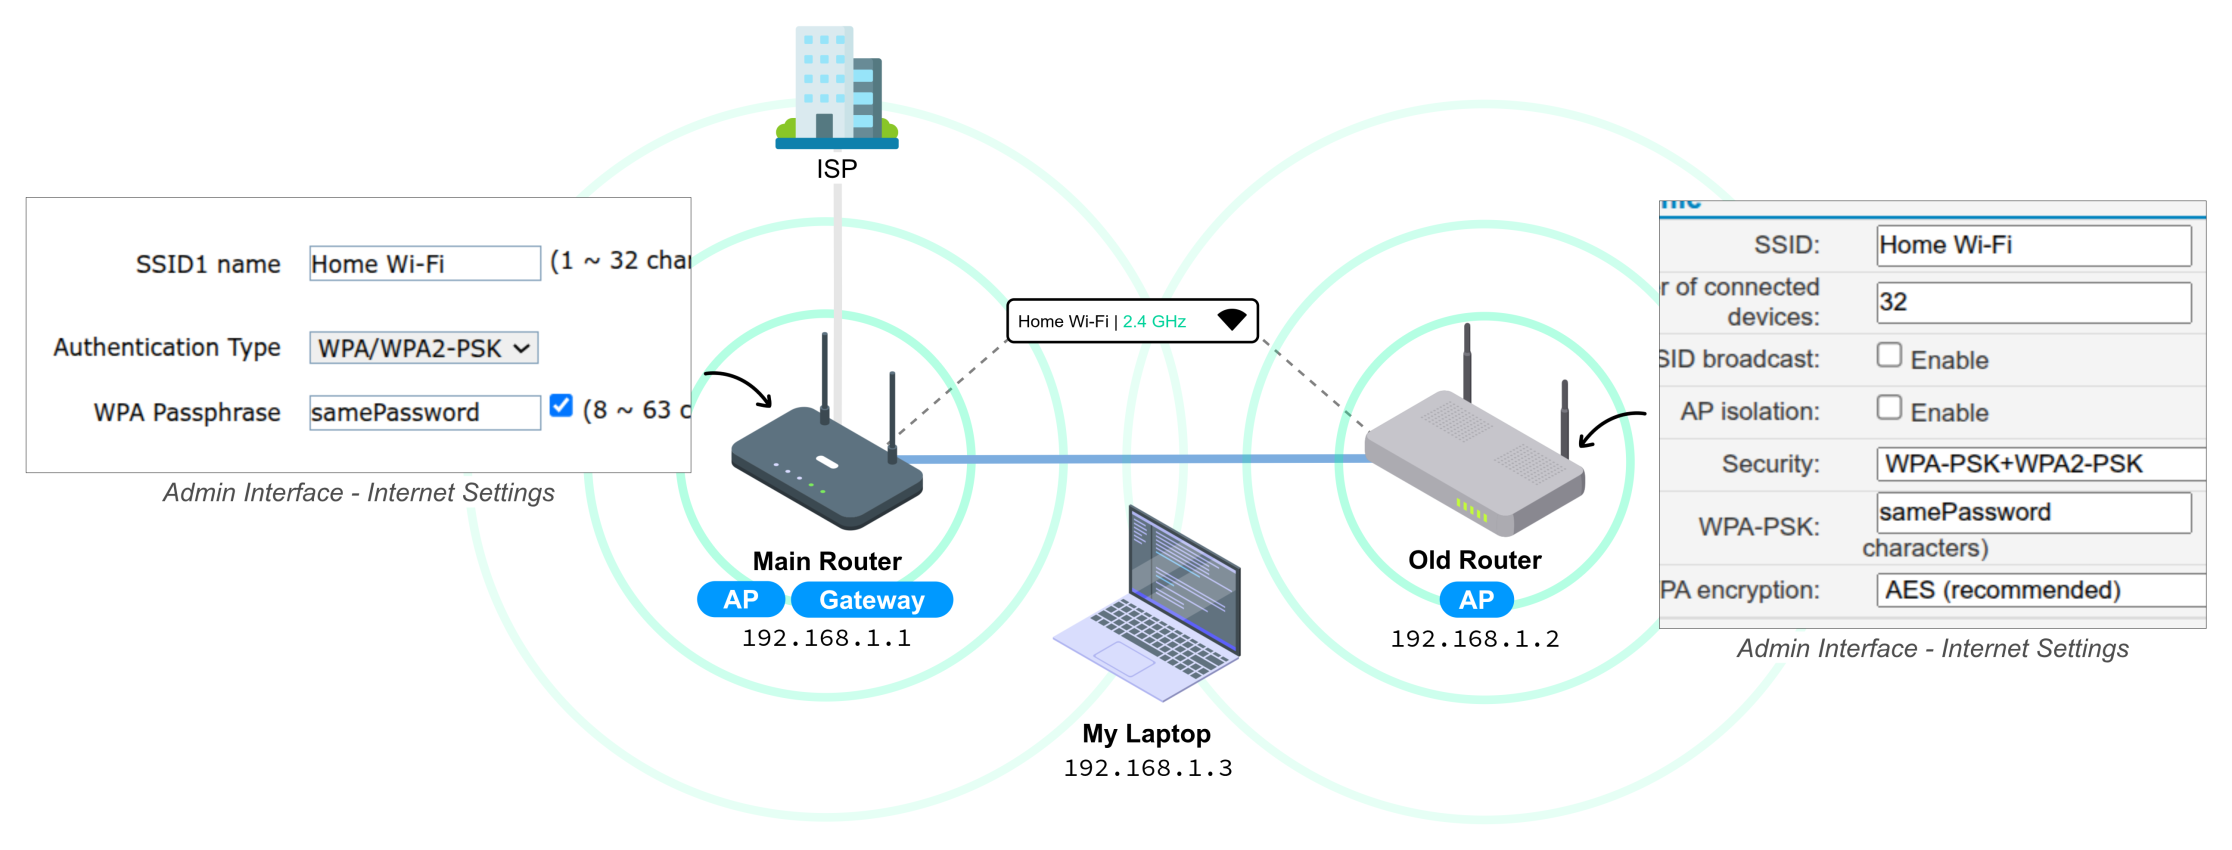
- In my case, my Main Router is set to SSID: “Home Wi-Fi” and Passphrase: “samePassword”. So, I simply copied the same settings into the Old Router: “Home Wi-Fi” and “samePassword”. Don’t forget to also match the security settings like WPA2-PSK with the Main Router, so the entire Wi-Fi network is equally protected.
4. Cabling Between Routers
The final step is to connect the two routers with an Ethernet cable—this is when they’ll start ‘talking’ to each other.
I needed a fairly long run to connect from my bedroom to the living room. So, I bought a 15-meter pre-made Cat 6 UTP Ethernet cable for around 35,000 MMK at a local shop.
You can still use Cat 5e cables if you only need up to 1 Gbps speeds, but Cat6 can still be a better choice. It offers Higher bandwidth (250 MHz) to handle client without becoming a bottleneck, and Future-proofing to be ready for upgrades like faster internet or a NAS, which I will upgrade soon.
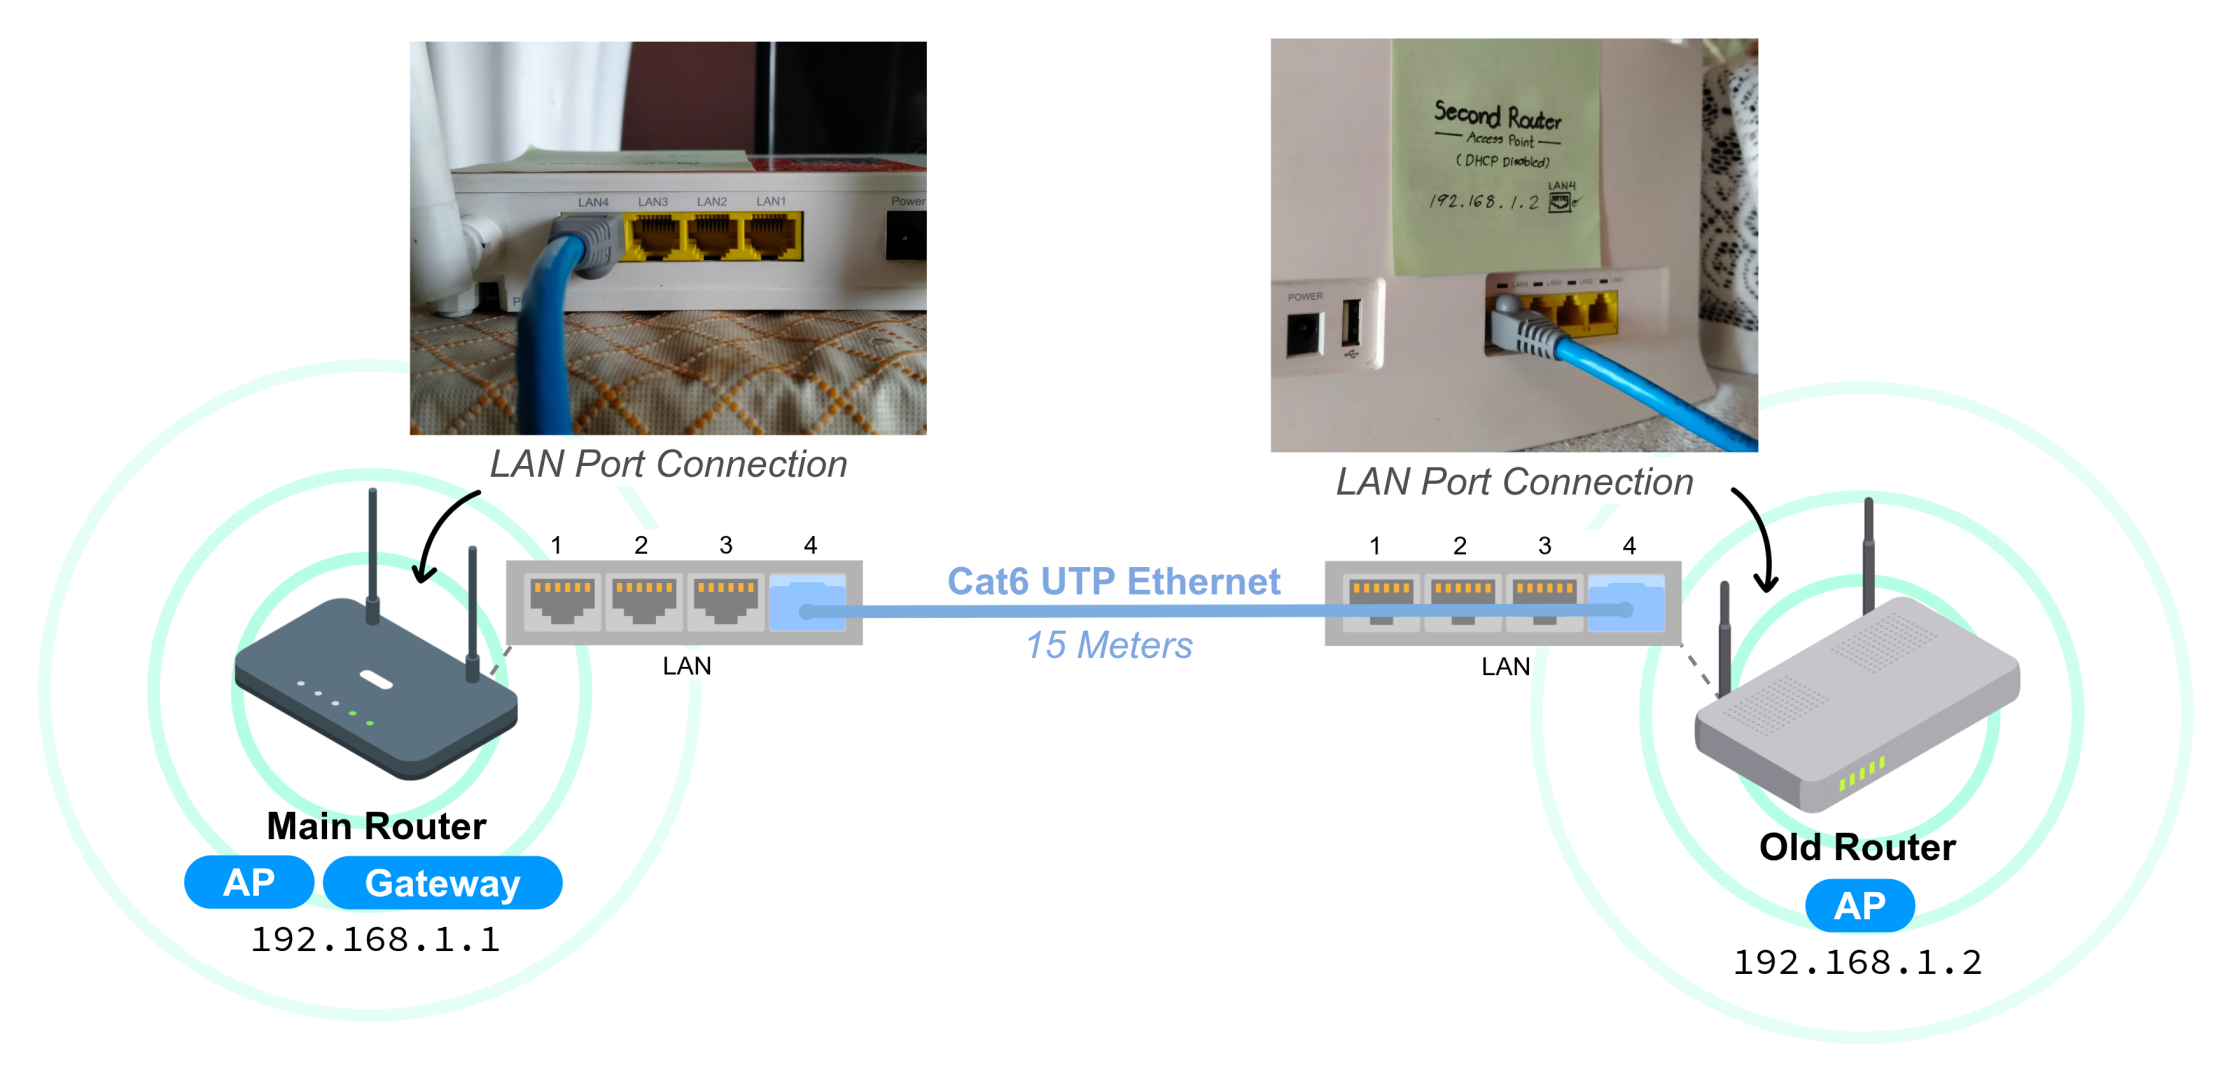
- To set it up, plug one end of the Ethernet cable into a LAN port on the main router (192.168.1.1) and the other end into a LAN port on the old router (192.168.1.2). I used port 4 on both devices. Be careful not to use the WAN/Internet port on the old router, it would break the AP setup.
- Finally, place the routers where you want them, reboot both devices, and check the link/activity lights on the Ethernet ports to confirm the connection is live.
Finishing Up
We’ve completed the setup of turning an old router into an AP to extend our home Wi-Fi coverage. Now, the final step comes to make sure everything works as expected.
Connectivity & Performance Test
- On your client device (Windows/Linux/Termux), run a ping test to the access point’s static IP to confirm it’s reachable:
$ ping 192.168.1.2  # old router’s IP
PING 192.168.1.2 (192.168.1.2) 56(84) bytes of data.
64 bytes from 192.168.1.2: icmp_seq=1 ttl=64 time=43.4 ms
64 bytes from 192.168.1.2: icmp_seq=2 ttl=64 time=1.86 ms
...- Walk around your home, moving between the main router’s coverage and the access point’s zone. You should experience seamless roaming without disconnections.
- For more detailed analysis, apps like WiFiman can measure signal strength and show performance graphs in real-time.
- If speeds seem unstable, try adjusting Wi-Fi channel settings or lowering the access point’s transmit power to reduce interference.
Troubleshooting
If the AP isn’t working as expected, check the basics that fixed for me:
- Confirm the Ethernet cable is connected LAN-to-LAN, not into the old router’s WAN port. Otherwise, it will create a separate network.
- If you can’t get internet, make sure to check that DHCP is disabled on AP (Old Router) and the only Main Router is handling IP assignments.
- For weak Wi-Fi signals or random drops, try changing the wireless channel to avoid interference and double-check your SSID and password match the main router.
- If you can’t reach the s web interface, temporarily set your computer to a static IP in the same subnet (e.g., 192.168.1.10) and log back in. As a last resort, factory reset the router and repeat the steps carefully.
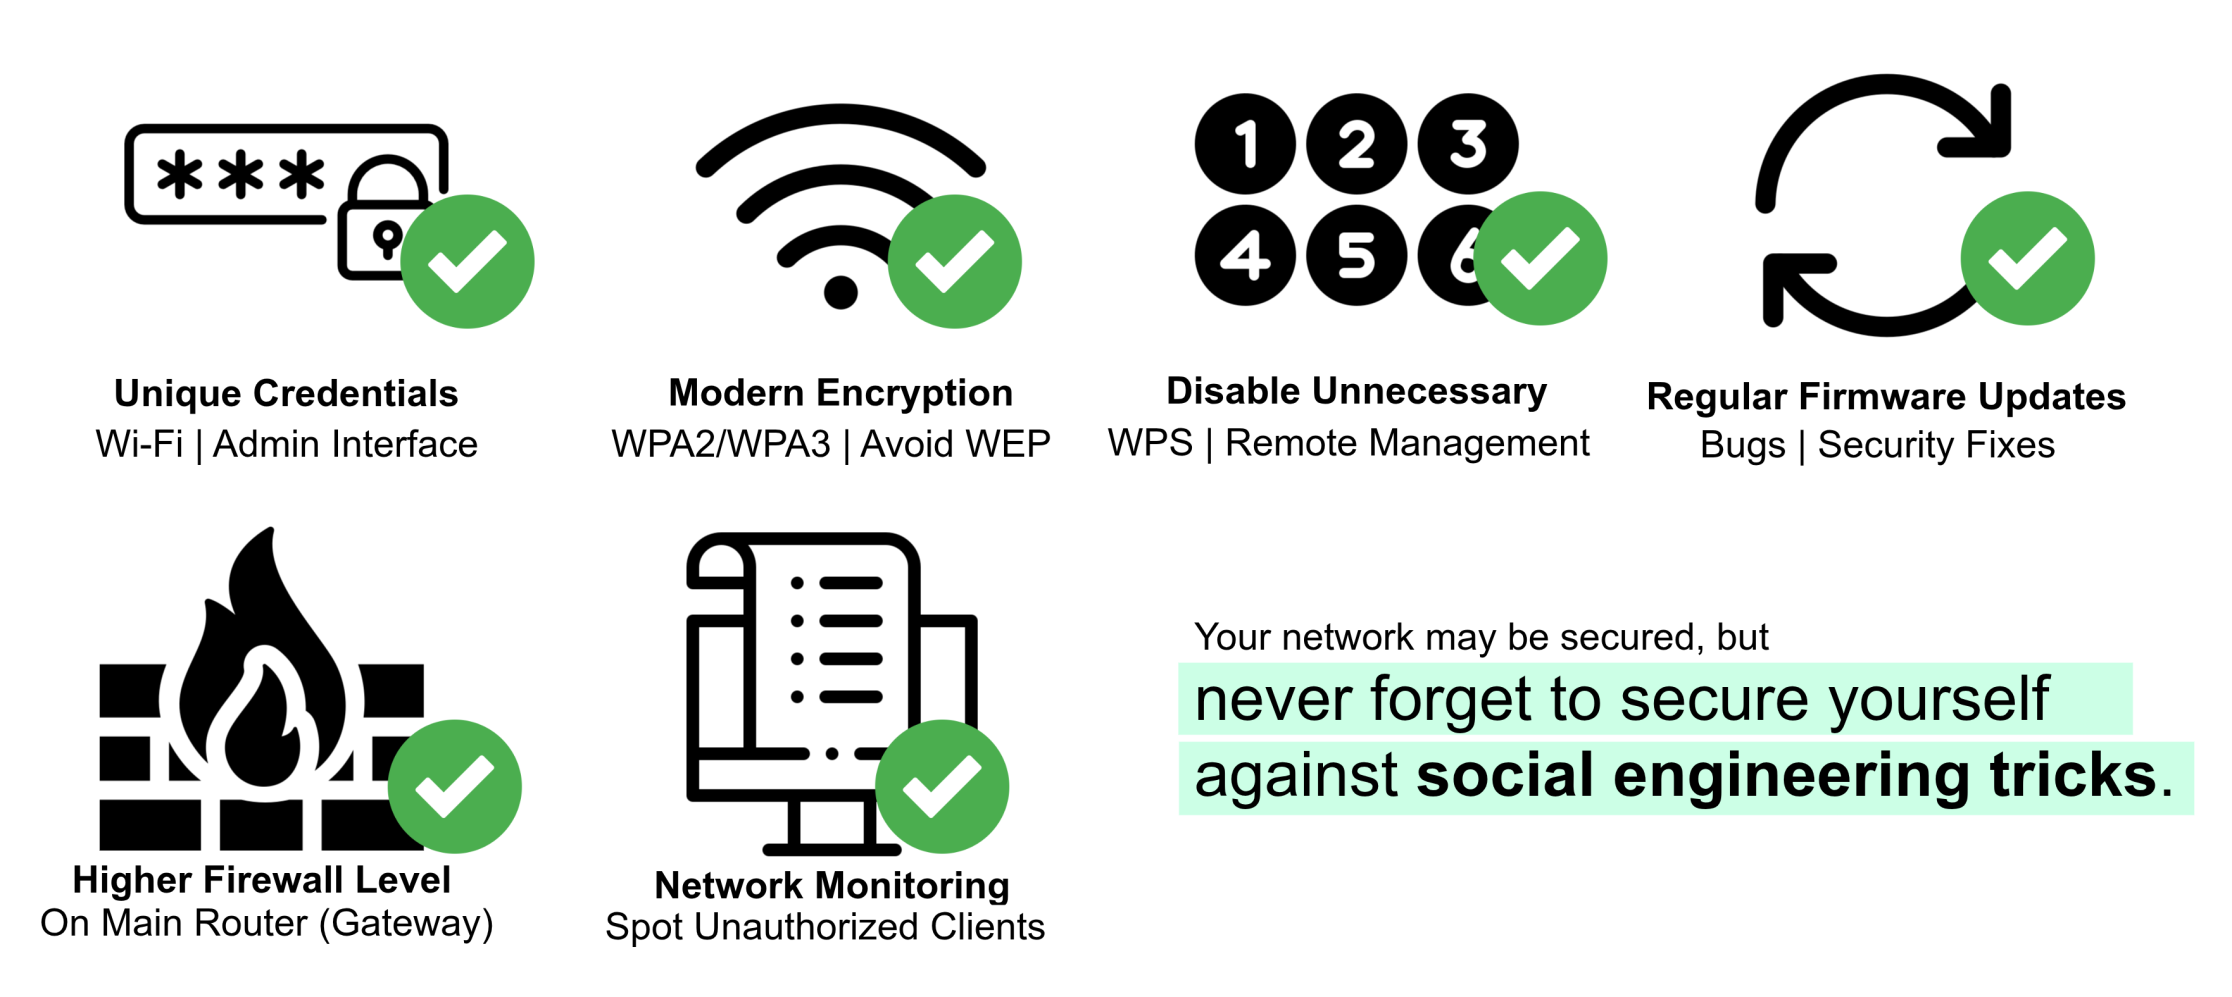
Security Practices: It’s Extra Work, But Absolutely Essential!
This is an area we often overlook—especially when it comes to the fundamental aspects of cybersecurity, myself included. You should put in as much effort as you can to protect your home network. It’s not just about convenience—neighbors or outsiders might try to access your Wi-Fi without you even realizing it.
- If possible, after all the setup, create a separate ‘Guest’ network for your home. It’s best to keep guest devices isolated.
Conclusion
What started as a small home networking project helped me to understand some networking concepts and see how real networks actually work. I got hands-on with things like DHCP and IP addressing, which I’d only read about before. As I went through the setup and wrote everything down, I learned a lot through research, trial and error, and just taking notes step by step.
The effort was totally worth it. I now have smoother connectivity and stable performance for home labbing, browsing, and online classes. Honestly, even something as simple as a 15-meter Ethernet cable made a completely difference that changed my entire home Wi-Fi experience.